本文是 Build Your Own React 的翻译兼阅读笔记
createElement React 的每一个 element 包含的内容为 type 和 props。
1
2
3
4
5
6
7
const element = { type : "h1" , props : { title : "foo" , children : "Hello" , }, }
要把上述内容渲染为 dom,我们需要以下代码:
1 2 3 4 5 6 7 8 9 10 11 12 13 const node = document .createElement(element.type);node.title = element.props.title; const textNode = document .createTextNode('' );textNode.nodeValue = element.props.children; node.appendChild(textNode); const container = document .getElementById('root' );container.appendChild(node);
这里默认 dom 代表真实的 dom 元素,而 element 代表 react 元素
现在让我们尝试创造一个自己的 createElement。我们需要做的就是把 JSX 转换为一个 object。
1
2
3
4
5
6
7
8
9
function createElement (type, props, ...children ) return { type, props : { ...props, children, } } }
比方说,
createElement(“div”) 结果是
1
2
3
4
{ type : "div" , props : { children : [] } }
createElement(“div”, null, a) 结果是
1
2
3
4
{ "ype: " div", props: { children: [a] } }
createElement(“div”, null, a, b) 结果是
1
2
3
4
{ type : "div" , props : { children : [a, b] } }
考虑到 children 其实不一定是 object 类型,我们需要为 children 再创建一个特殊类型 TEXT_ELEMENT。
1
2
3
4
5
6
7
8
9
function createTextElement (text ) return { type : 'TEXT_ELEMENT' , props : { nodeValue : text, children : [], }, } }
同时修改 createElement 如下:
1
2
3
4
5
6
7
8
9
10
11
function createElement (type, props, ...children ) return { type, props : { ...props, children : children.map(child => typeof child === 'object' ? child : createTextElement(child) )) } } }
为了更有逼格而且摆脱 React 的束缚,我们要起一个很装逼的名字 ———— Didact。
1
2
3
4
5
6
7
8
9
10
11
12
13
14
const Didact = { createElement, } const element = Didact.createElement( "div" , {id : "foo" }, Didact.createElement('a' , null , 'bar' ), Didact.createElement('b' ) ) const container = document .getElementById('root' );ReactDOM.render(element, container);
render 1 2 3 4 5 6 7 8 9 10 11 12 13 14 15 16 17 function render (element, container ) const dom = element.type === 'TEXT_ELEMENT' ? document .createTextNode('' ) : document .createElem(element.type); const isProperty = key =>'children' ; Object .keys(element.props).filter(isProperty) .forEach(name => dom.name = element.props.name; }) element.props.children.forEach(child => container.appendChild(dom); }
目前前两步的代码在 codesandbox 的地址
Concurrent Mode 目前代码其实有一个很大的问题,一旦开始 render,就会不停递归直至渲染完整棵树。如果这棵树非常大的话,他就会长时间占用主线程,导致卡顿。这时候如果浏览器希望做一些更高优先级的事情,比如先去接收用户的输入,将会无法进行,直至渲染完成。
所以我们需要把渲染流程分成多个小单元,在我们渲染完成每一个小单元之后,我们可以让浏览器打断我们的渲染,只要它有别的高优先级任务需要完成。
1 2 3 4 5 6 7 8 9 10 11 12 13 14 15 16 17 18 let nextUnitOfWork = null ; function workLoop (deadline ) let shouldYield = false ; while (nextUnitOfWork && !shouldYield) { nextUnitOfWork = performUnitOfWork(nextUnitOfWork); shouldYield = deadline.timeRemaining() < 1 ; } requestIdleCallback(workLoop); } requestIdleCallback(workLoop);
需要注意的是 React 现在不再使用 requestIdleCallback 了。取而代之的是 scheduler package,但这对于我们理解原理没有太大影响。
requestIdleCallback 还会给我们一个 deadline 参数,我们可以用它来检查在浏览器需要再次获得主线程的控制权之前,我们还能剩下多少时间。
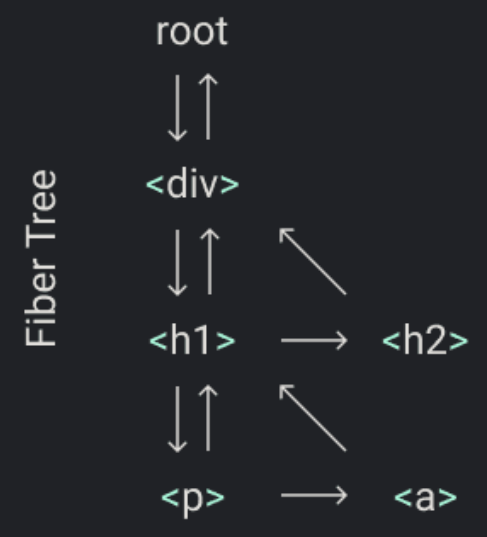
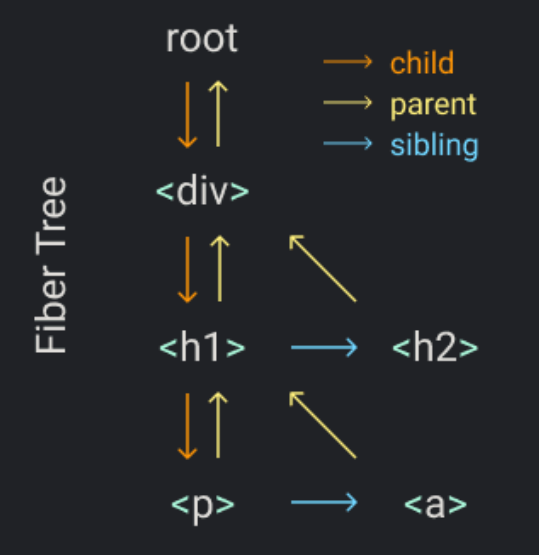
Fibers 为了组织 unit 的结构我们需要一个数据结构叫做 fiber tree。
每一个元素会拥有一个 fiber,而每一个 fiber 会成为 work 的一个 unit。
比如说我们要渲染一棵如下的树:
1 2 3 4 5 6 7 8 9 10 Didact.render( <div > <h1 > <p /> <a /> </h1 > <h2 /> </div > , container )
在渲染的时候我们会创建 root fiber,并把它设置为 nextUnitOfWork。剩下我们需要在 performUnitOfWork 函数中对 fiber 做以下三件事:
把节点挂载到 dom 树 为节点的 child 创建 fiber 选择下一个 unit 使用 fiber 数据结构的目的就是为了更简单地找到下一个 unit。所以每一个 fiber 和它的第一个孩子、以及紧邻它的兄弟之间都会直接相连。如下所示:
当我们完成了 fiber 上的渲染任务,如果这个 fiber 有 child,这个 child 就会成为下一个 unit。比如说对于上面的例子,div 渲染完成后就轮到 h1 了。
如果当前 fiber 没有 child,就会把紧贴的兄弟节点作为下一个 unit。比如上面例子中的 p,它没有 child 了,所以会把兄弟 a 作为下一个 unit。
如果当前 fiber 没有 child,也没有 sibling,我们就去找它的 uncle,也就是 parent 的兄弟。比如说 a,既没有 child 也没有下一个兄弟了,只能回去找它爹 h1 的兄弟 h2。
同理,如果它爹也没有兄弟,就继续找它爹的爹,如此遍历直到我们到达 root。当到达 root 也就意味着完成了 render。
现在我们将其编写成代码:
1 2 3 4 5 6 7 8 9 10 11 12 13 14 15 16 17 18 19 20 21 22 23 24 25 26 27 28 29 30 31 32 33 34 35 36 37 38 39 40 41 42 43 44 45 46 47 48 49 50 51 52 53 54 55 56 57 58 59 60 61 62 63 64 65 66 67 68 69 70 71 72 73 74 function render (element, container ) nextUnitOfWork = { dom : container, props : { children : [element], }, } } let nextUnitOfWork = null ;function workLoop (deadline ) let shouldYield = false ; while (nextUnitOfWork && !shouldYield) { nextUnitOfWork = performUnitOfWork(nextUnitOfWork); shouldYield = deadline.timeRemaining() < 1 ; } requestIdleCallback(workLoop); } requestIdleCallback(workLoop); function performUnitOfWork (fiber ) if (!fiber.dom) { fiber.dom = createDom(fiber); } if (fiber.parent) { fiber.parent.dom.appendChild(fiber.dom); } const elements = fiber.props.children; let index = 0 ; let prevSibling = null ; while (index < elements.length) { const element = elements[index]; const newFiber = { type : element.type, props : element.props, parent : fiber, dom : null , } if (index === 0 ) { fiber.child = newFiber; } else { prevSibling.sibling = newFiber; } prevSibling = newFiber; index++; } if (fiber.child) { return fiber.child; } let nextFiber = fiber; while (nextFiber) { if (nextFiber.sibling) { return nextFiber.sibling; } nextFiber = nextFiber.parent; } }
commitRoot 现在我们又遇到了一个新问题,现在我们每个 unit 渲染时都会把一个 dom 挂载到树上,而浏览器可以随时打断我们的渲染。这也就意味着,如果只有部分 unit 完成了渲染,用户将看到不完整的 UI。这不是我们所想要的。
所以我们需要把挂载 dom 的部分从原来的 render 代码中删除。取而代之的持续追踪 fiber 的根,我们将其命名为 wipRoot。
1 2 3 4 5 6 7 8 9 10 11 function render (element, container ) wipRoot = { dom : container, props : { children : [element], }, } nextUnitOfWork = null ; } let wipRoot = null ;
当我们完成渲染之后,也就是没有 next unit 的时候,我们直接把整棵树挂载到 dom 上。
这一阶段我们叫做 commitRoot。
1 2 3 4 5 6 7 8 9 10 11 12 13 14 function commitRoot ( commitWork(wipRoot.child); wipRoot = null ; } function commitWork (fiber ) if (!fiber) { return ; } const domParent = fiber.parent.dom; domParent.appendChild(fiber.dom); commitWork(fiber.child); commitWork(fiber.sibling); }
Reconciliation 调和 目前为止我们的所有操作都是针对于添加节点到 dom 中,那么如果我们要删除或更新节点呢?
这时候我们就需要比对 fiber 中元素和当前元素的情况。
所以我们需要一个变量来存储最新 commit 的 fiber,我们将其称为 currentRoot。
我们还要给每个 fiber 提供一个候选项 alternate,这个是一个直达旧的 fiber 的 link。
我们设置一个函数 reconcileChildren,用来调和旧的 fiber 和新的 react elements。
1 2 3 4 5 6 7 8 9 10 11 12 13 14 15 16 17 18 19 20 21 22 23 24 25 26 27 28 29 30 31 32 33 34 35 36 37 38 39 40 41 42 43 44 45 46 47 function reconcileChildren (wipFiber, elements ) let index = 0 ; let oldFiber = wipFiber.alternate?.child; let prevSibling = null ; while (index < elements.length || oldFiber !== null ) { const element = elements[index]; let newFiber = null ; if (oldFiber) { const sameType = oldFiber && element && element.type === oldFiber.type; } if (sameType) { newFiber = { type : oldFiber.type, props : element.props, dom : oldFiber.dom, parent : wipFiber, alternate : oldFiber, effectTag : 'UPDATE' , } } if (element && !sameType) { newFiber = { type : element.type, props : element.props, dom : null , parent : wipFiber, alternate : null , effectTag : 'PLACEMENT' , } } if (oldFiber && !sameType) { oldFiber.effectTag = "DELETION" ; deletions.push(oldFiber); } } }
迭代整个 react elements 的同时,我们也要迭代旧的 fiber 节点,即 wipFiber.alternate。
现在我们要比较 oldFiber 和 element 之间的差异。
比较的步骤如下:
新旧节点类型相同,复用旧的 dom,只修改上面的属性。 节点类型不同,而且有新的 element,我们需要创建一个新的 dom 节点 类型不同,且 oldFiber 存在,需要删除旧节点 React 会通过属性 key 来优化调和步骤,key 可以用来检查 elements 数组中的子组件是否仅仅只是更换了位置。
因此我们需要一个数组来保存要移除的 dom 节点。
修改 render 函数如下:
1
2
3
4
5
6
7
8
9
10
11
12
13
14
15
16
function render (element, container ) wipRoot = { dom : container, props : { children : [element], }, alternate : currentRoot, } deletions = []; nextUnitOfWork = wipRoot; } let nextUnitOfWork = null ;let currentRoot = null ;let wipRoot = null ;let deletions = null ;
修改 commitWork 函数如下:
1
2
3
4
5
6
7
8
9
10
11
12
13
14
15
16
17
18
19
20
21
22
23
24
25
26
27
function commitWork (fiber ) if (!fiber) { return ; } const domParent = fiber.parent.dom; if (fiber.effectTag === 'PLACEMENT' && fiber.dom !== null ) { domParent.appendChild(fiber.dom); } else if (fiber.effectTag === "DELETION" ) { domParent.removeChild(fiber.dom) } else if ( fiber.effectTag === "UPDATE" && fiber.dom != null ) { updateDom( fiber.dom, fiber.alternate.props, fiber.props ); } commitWork(fiber.child); commitWork(fiber.sibling); }
下面我们实现 updateDom 函数。
1
2
3
4
5
6
7
8
9
10
11
12
13
14
15
16
17
18
19
const isProperty = key =>"children" ;const isNew = (prev, next ) => key =>const isGone = (prev, next ) => key =>in next);function updateDom (dom, prevProps, nextProps ) Object .keys(prevProps).filter(isProperty) .filter(isGone(prevProps, nextProps)) .forEach(name => dom.name = '' ; }) Object .keys(nextProps).filter(isProperty) .filter(isNew(prevProps, nextProps)) .forEach(name => dom.name = nextProps.name; }) }
有一种比较特殊的属性值是事件监听,这里假设以 on 开头的就是事件监听。
1
2
const isEvent = key =>"on" );const isProperty = key =>"children" && !isEvent(key);
对于事件监听我们需要做以下处理:
1 2 3 4 5 6 7 Object .keys(prevProps).filter(isEvent) .filter(key =>in nextProps) || isNew(prevProps, nextProps)) .forEach(name => const eventType = name.toLowerCase().substring(2 ); dom.removeEventListener(eventType, prevProps.name); })
1 2 3 4 5 6 7 Object .keys(nextProps).filter(isEvent) .filter(isNew(prevProps, nextProps)) .forEach(name => const eventType = name.toLowerCase().substring(2 ); dom.addEventListener(eventType, nextProps.name); })
Function Components 下一步我们要支持函数组件。
1 2 3 4 5 6 7 function App (props ) return <h1 > Hi {props.name}</h1 > } const element = <App name ="foo" /> const container = document .getElementById("root" );Didact.render(element, container);
这个 jsx 语法应该被转换为以下的 js 语法:
1
2
3
4
5
6
7
8
9
10
11
12
function App (props ) return Didact.createElement( "h1" , null , "Hi " , props.name ) } const element = Didact.createElement(App, { name : "foo" , });
函数组件与之前的语法有两个不同之处:
函数组件的 fiber 没有 dom 子节点由函数运行得到,而不是直接从 props 获取 1 2 3 4 5 6 7 function performUnitOfWork (fiber ) if (!fiber.dom) { fiber.dom = createDom(fiber); } const elements = fiber.props.children; reconcileChildren(fiber, elements); }
当 fiber 类型为函数时,我们使用不同的函数来进行更新。在 updateHostComponent 我们按照之前的方法更新。
1 2 3 4 5 6 7 8 9 10 11 12 13 const isFunctionComponent = fiber.type instanceof Function ;if (isFunctionComponent) { updateFunctionComponent(fiber); } else { updateHostComponent(fiber); } function updateHostComponent (fiber ) if (!fiber.dom) { fiber.dom = createDom(fiber); } reconcileChildren(fiber, fiber.props.children); }
在函数组件中我们通过执行函数来获得 children。
1 2 3 4 function updateFunctionComponent (fiber ) const children = [fiber.type(fiber.props)] reconcileChildren(fiber, children) }
对于前面的例子
1 2 3 4 function App (props ) return <h1 > Hi {props.name}</h1 > } const element = <App name ="foo" />
fiber.type 就是 App 函数,当执行函数的时候,就会返回 h1 元素。
一旦我们拿到了这个子节点,剩下的调和就跟之前一致,我们不需要修改任何东西了。
接下来修改 commitWork 函数。
1 2 3 4 5 6 7 8 9 10 11 12 13 14 15 16 17 18 19 20 21 22 23 24 25 26 27 28 29 30 31 32 function commitWork (fiber ) if (!fiber) { return } let domParentFiber = fiber.parent; while (!domParentFiber.dom) { domParentFiber = domParentFiber.parent; } const domParent = domParentFiber.dom; if ( fiber.effectTag === 'PLACEMENT' && fiber.dom !== null ) { domParent.appendChild(fiber.dom) } else if ( fiber.effectTag === 'UPDATE' && fiber.dom != null ) { updateDom( fiber.dom, fiber.alternate.props, fiber.props ) } else if (fiber.effectTag === 'DELETION' ) { domParent.removeChild(fiber, domParent); } commitWork(fiber.child) commitWork(fiber.sibling) }
Hooks 最后一步我们来给函数组件添加 state。我们把示例组件设置为经典的计数器。
1 2 3 4 5 6 7 8 9 10 function Counter ( const [state, setState] = Didact.useState(1 ) return ( <h1 onClick ={() => setState(c => c + 1)}> Count: {state} </h1 > ) } const element = <Counter />
1 2 3 4 5 6 7 8 9 10 let wipFiber = null ;let hookIndex = null ;function updateFunctionComponent (fiber ) wipFiber = fiber; hookIndex = 0 ; wipFiber.hooks = []; const children = [fiber.type(fiber.props)]; reconcileChildren(fiber, children); }
在对应的 fiber 上加上 hooks 数组以支持我们在同一个函数组件中多次调用 useState。然后我们记录当前 hook 的序号。
当函数组件调用 useState,我们查看 fiber 对应的 alternate 字段下的旧 fiber 是否存在旧 hook、以及hook 的序号用以记录是该组件下的第几个 useState。
如果存在旧的 hook,我们将旧的 hook 值拷贝一份到新的 hook。 如果不存在,就将 state 初始化。
然后在 fiber 上添加新 hook,hook 序号会进行自增,然后返回状态。
1
2
3
4
5
6
7
8
9
10
11
12
13
14
15
16
17
18
19
20
21
22
23
24
25
26
27
28
29
30
31
32
function useState (initial ) const oldHook = wipFiber.alternate && wipFiber.alternate.hooks && wipFiber.alternate.hooks[hookIndex]; const hook = { state : oldHook ? oldHook.state : initial, queue : [], }; wipFiber.hooks.push(hook); hookIndex++; return [hook.state]; } const actions = oldHook ? oldHook.queue : [];actions.forEach(action => hook.state = action(hook.state) }); const setState = action => hook.queue.push(action); wipRoot = { dom : currentRoot.dom, props : currentRoot.props, alternate : currentRoot, } nextUnitOfWork = wipRoot; deletions = []; }
useState 还需要返回一个可以更新状态的函数,我们定义 setState,它接收一个 action。(在 Counter 的例子中, action 是自增 state 的函数)
最终完整的 mini-react 代码链接在 https://codesandbox.io/s/didact-8-21ost